Having recently read Not Your Norm’s blog post on his homebrewing setup, we were inspired to do the same about our brewgarage. We are still several months from brewing on a real professional system, so we’ll continue to use this system in the future. In addition, we certainly plan on piloting batches in the brewery at smaller scale (say, 10 gallons), and as we have no plans to purchase a pilot brewery, I’m guessing we’ll use this setup after we open as well.
Please note: this is not the “Here’s how you make beer!” lesson you can find on many, many other sites. So, if you don’t already have this info, check these out, join a homebrewing club, or read on and try not to get lost! Also, if you like beer, but really do not care about how it’s made, we sense you are about to click somewhere else. But before you do! Brewing beer is really interesting, and really fun. I’m not sure we’d want to brew beer for a living if it wasn’t interesting and challenging. Brewing, as a science, still holds plenty of mysteries that need to be solved. We’ve said to before: we like brewing beer as much as we like drinking beer. Almost.
One overriding concept. Our system is definitely NOT the cheapest – we have bought quite a few things – but it is far from the most expensive either. We place emphasis on accurate measurements and control, not on gadgets and tinkertoys. Not that there’s anything wrong with that. But just so you know where we’re coming from – it’s the process – that is to say, it’s the brewers - that make great and consistent beer – not the equipment.
Facility
Ah, the brewgarage.
In the winter, Corey’s got a small propane heater which keeps it downright toasty. In the summer – well, it’s 95 degrees in there. But there’s tons of room. We use a large propane burner for boiling 10 gallons and a smaller one for heating up water. Our water source is a bit of a pain. The faucet is attached to the house about 20 feet away. We get it a little closer by attaching some food grade tubing to the end and a faucet near the garage. There’s a freezer in there for keeping things, um, cold. There’s also Corey’s Chevelle. Did we mention it’s for sale? (email us, immediately, if interested…)
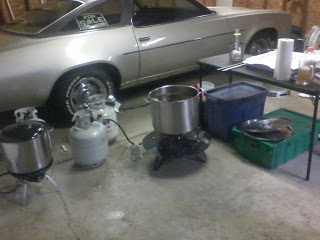 |
| The standard setup - including the Chevelle |
Mash and Grains
We used to get our grains pre-crushed – but the purchase of a mill was one of the best brewing purchases we’ve made. We use the Barley Crusher with a drill attachment. Takes us about 5 mins to weigh and crush all grains, and our efficiency is much more repeatable than it was then. The key to milling grain is consistent gap setting, which do using a set of sparkplug feeler gages.
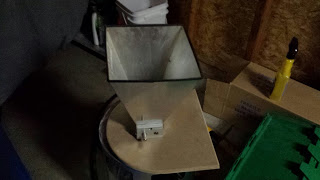 |
| The mill |
Our mash setup is sort of unique, we think. We have two kettles: one for 5 gallons and one for 10. For 5 gallon batches, we actually fill the 10 gallon with water, and then heat it to our mash temp using our large burner. We crush the grains and place them in our 5 gallon kettle, which we place inside of the larger kettle. Then add strike water, stir, check temp, usually adjust down with cold water or up by heating the “jacketed” 10 gallon kettle. Why do it this way? We get VERY stable mash temps (like, less than one degree over 90 minutes is typical), and we can heat and cool if we need to. It’s very flexible.
 |
| Kettles |
Oh yeah, we measure temps using a used digital meter. Digitals give you quicker readings, but tend to fluctuate and require periodic calibration. We prefer the fast response time with the digital, that’s the only reason we use it.
Another thing we became obsessed with is mash pH and water adjustments. We have ruined batches by poor pH management. Mash pH and water doesn’t matter much if you’re making a balanced, amber colored ale. But, if you’re making something very light, or very dark, or something that requires accenting sweetness or bitterness – check your mash pH. We have a used digital meter for this as well. We’ll make adjustments using Bru’n Water. The spreadsheets get you very close in terms of targets if you know your base water – if you call up ECWA, they will give you the current profiles (and then they’ll say “hey, you must be a homebrewer!”) We also adjust the pH of our sparge water, to prevent tannin extraction from the grains. We mostly use a small quantity (below the flavor threshold) of lactic acid for this.
Sparge
We don’t have a gravity fed system. It’s all pumps and pouring for us. Once the mash is done, we’ll gently scoop the mash from the kettle to our lauter tun, the picnic cooler/manifold type. As the years have gone by – and we had some dreaded stuck mashes – we’ve opened up more and more holes in the copper manifold. Another tip for homebrewers – a few rice hulls go a long way.
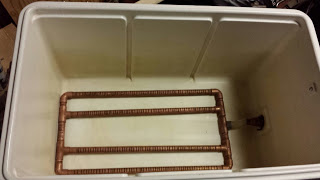 |
| Mash/lauter tun + copper manifold |
This item is a homebrewer’s best friend: a ½ gallon Oxo measuring cup. I got this as a gift, believe it or not, and was ecstatic. We use this thing all the time to handle hot and cold liquids. We even sanitize and use to transfer wort or water. We use it to move the mash from the kettle to the picnic cooler.
We’ll recirc the wort a few times using the measuring cup, then start draining into the (now cleaned) 5 gallon kettle. Once the bed is almost free of liquid, we’ll turn on a pump connected to the smaller kettle, which holds our 168 degree water. Corey will maniacally check this temperature for the next 30 to 60 minutes during the sparge to (again) prevent any tannin extraction. We’ll starting heating the kettle after 2-3 gallons are collected, and stop sparging once we’ve hit our target volume – which we measure using a calibrated dipstick for this kettle size.
Making beer takes a long time! And so does reading this article!!! I’ll recap hops and boil, yeast, and fermentation next week. One thing to mention now, and I’ll mention it again next week – we love helping homebrewers. Any questions or issues with your system? Anything above that doesn’t make sense? Let us know. Our homebrews are open sessions too. Let us know if you want to come out and help brew some beer. And maybe drink a few too.